Jun 25, 2007

A taste of my homeland

A famous Marathi song goes on these lines, “Arre sansar sansar, jasa tava chulyavara, aadhi hatala chatake, tevha milate bhakar”. Loosely translated this means, “Oh, the burdens of supporting a family are like a pan on a hot stove, you won’t get bread unless you burn your hands”. Marathi friends please ignore this futile attempt at a translation:)

Maharashtra: the land that produces rice, sugarcane, cotton, jowar, bajra, wheat, maize, and several other crops. And who produces these crops? None other than the farmers, toiling hard under the sun’s rays to provide us grains and food. They live a simple life and often find it difficult to eat and provide everyday meals to their families. Their day to day worries include rains, drought, and farm fires. Sadly, the farmers are in focus these days owing to their high suicide rates.

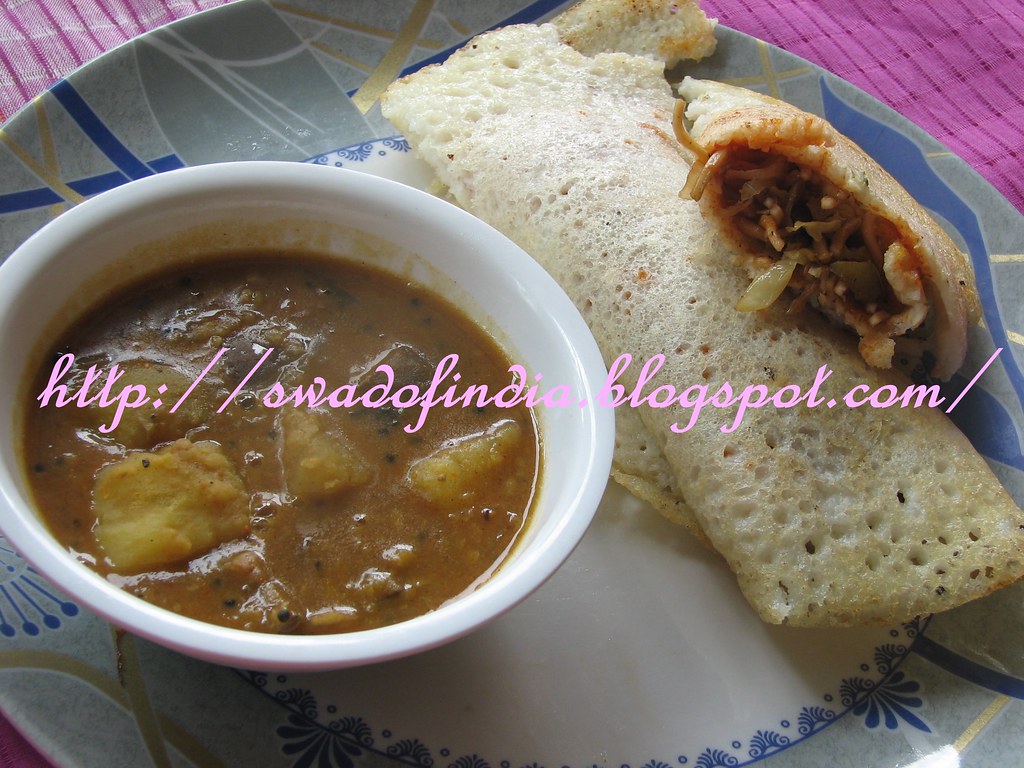
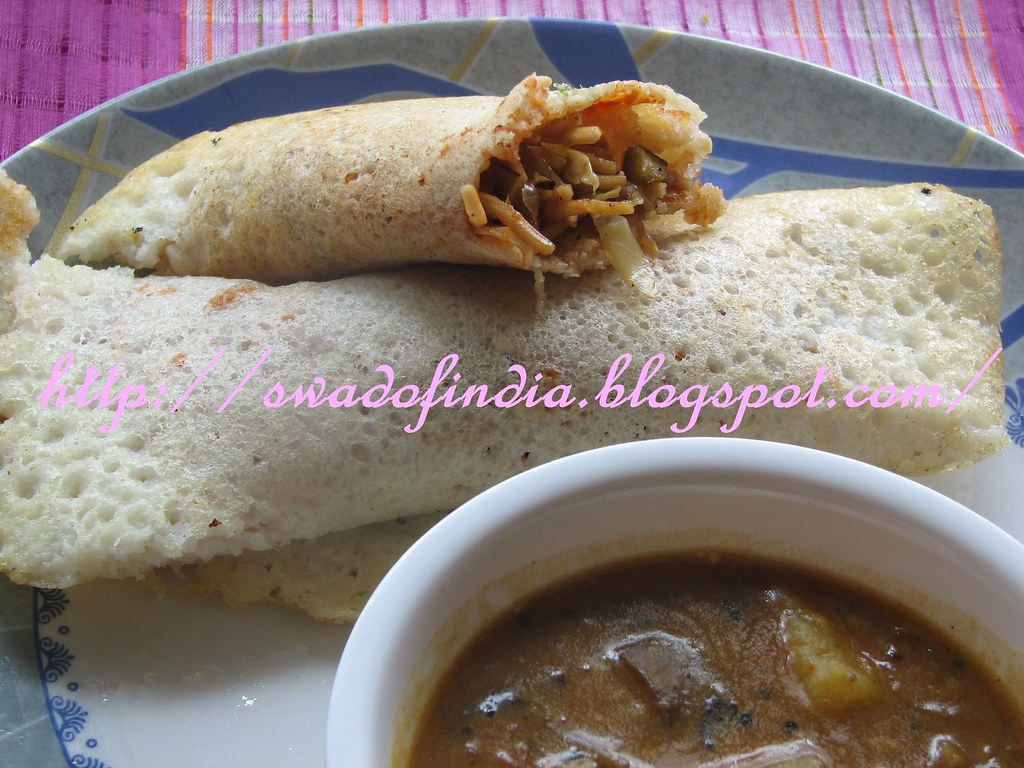
As a tribute to all the farmers and to celebrate RCI: Maharashtra, I made zunka-bhakar. Zunka is a spicy, dry gravy made using besan, whereas bhakar is an Indian flat bread. Bhakri can be made using jowar, bajra, or rice flour or a combination of these. Zunka Bhakar is a farmer’s meal. You must have seen numerous Marathi movies in which the farmer’s wife visits her husband on the field. She carries with her a staple meal of zunka, bhakri, mirchicha thecha (crushed green chillies), and kanda (onion). To the farmer, this meal would taste much better than any of the meals offered by 5-star restaurants. He will feel content, happy, and energetic on eating this meal. To add to it, bhakris are very healthy and filling.

I have a distinct memory of eating zunka-bhakar. When I was a kid, we had visited Pratapgad. The fort climbing and the cool weather made us terribly hungry. On the fort top, there was a family who were selling zunka-bhakar. They were making fresh hot bhakris in front of us and we would ask for more after the first one got over. Now, bhakris are really very filling and that lady was making the biggest bhakris ever. But they tasted so good with the zunka that we kept on eating more. She served chilled buttermilk to end a perfect meal. That was one helluva satisfying meal that I would never forget in my entire life.

This was the first time I made zunka and bhakri. I followed the recipe for zunka from here, just took less ingredients to serve 2.

Zunka

1.Heat a pan and dry roast the besan for 8 minutes on low flame. The besan will turn light pink and send out a beautiful aroma. Turn off the heat.
2.Chop one small onion and one small tomato. Also chop 2 green chillies and 2 garlic flakes.
3.Heat 1 tsp oil in a pan. Add ½ tsp mustard seeds and ¼ tsp cumin seeds. Wait till they splutter and then add green chillies, curry leaves, and chopped garlic. Once the garlic changes color (to light brown), add the chopped onions. Fry till the onions turn golden brown.
4.Add tomato and cook till it turns soft. Now, add besan, ¼ tsp turmeric powder, ¼ tsp red chilli powder, salt, and ½ cup water. Stir and check that no lumps are formed.
5.Cook for 5 minutes and serve hot.

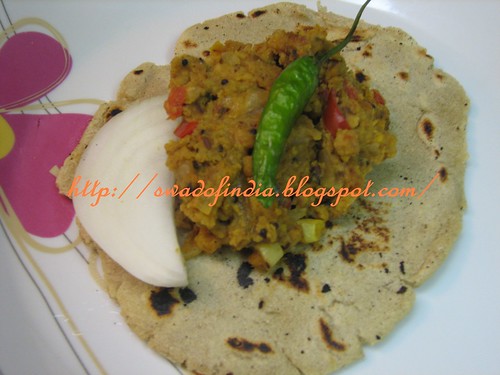
The zunka turned out fabulous. However, I faced loads of trouble while making the bhakris. They kept cracking at edges. Still, it was my first attempt and I am hoping to improve. I just could not make large bhakris. So, I and P had to settle for mini-bhakris.
Bhakris

1.Take 2 cups jowar (makes around 6 mini bhakris), add ¼ tsp salt, 1 tsp oil to it. Add water and make dough just the way you make for chapattis.

2.Heat a pan.

3.Take a big ball of dough and roll out the dough just the way you do while making chapattis. Sprinkle jowar flour to ease the rolling process.

4.Put the bhakri on the pan. Take some water and gently spread it on the bhakri. Cook for 2 minutes.

5.Flip on the other side and cook for 2 more minutes. Turn over again till there are brown spots on both sides.

6.Serve hot with zunka, onions, green chillies, and buttermilk. Bhakris can be alternately served with Pithala.

The next time you eat your meal, thank the farmer who supplied it. Jay Maharashtra!

Jun 22, 2007

Vegetable Pulao


We are soon approaching the end of our A-Z vegetables journey and I take this opportunity for the letter “V” to present my favorite supper. Indian food is diverse and the combination of dishes one can cook using vegetables is humongous. While an amateur cook struggles and learns the basics of cooking different vegetables, a daring cook experiments with different dishes and tries new vegetables. It becomes a matter of challenge, enthusiasm, and passion for cooking to go ahead and try stuffed parathas, Indo- Chinese dishes, soups, and pizzas. My favorite always has and always will be experimenting with rice dishes.

I love the results that rice and vegetable combos turn out. The simple addition of tomato and cilantro add a whole new flavor to Tomato Rice. Egg slices and spices produce spicy, flavorful Egg Pilaf. Though I have not made the famous Wangi Bhaat, I have tasted and loved it. A bunch of different veggies clubbed with Chinese sauces gives rise to everyone’s favorite Fried Rice. While these veggie-rice combos are easy to put together, there are other varieties that include time, effort, and loads of patience to try out. Top in the category are Vegetable Pulao and Biryani. Cutting vegetables is the most time consuming task; once done, it’s as good as half of the work been done. Whilst the pulao being a mixture of rice, vegetables, and pulao masala cook to perfection, the biryani is an intricate dish prepared using layers of vegetable gavy and saffron-flavored rice.

Aai (mom) often made vegetable pulao on Friday nights. It served three purposes – it gave her a welcome break from the usual chapatti bhaji, and it gave her a valid excuse to stuff our tummies with our not-so-favorite veggies. And of course, making pulao allows you to clean the fridge of all those itty bitty vegetables. The addition of saar would be “sone pe suhaga”. Now, I was a light eater in my teenage days and only such favorite suppers would turn me into a hungry hyena. I would/could/do consume at least 3-4 plates of vegetable pulao and saar. Check out the recipe.

Vegetable Pulao

Serves: 4
Preparation time: 1 ½ hour
For the masala:
After the success of metkut, my confidence in making home-made masalas has increased. This was one more attempt of making one such powder – the pulao masala. The source of the masala recipe is Annapoorna.

Grind together 2 tbsp coriander seeds, 1 tbsp cumin seeds, 1 tsp shahi cumin seeds, 3-4 sticks of cinnamon (1 inch long), 5-6 cloves, 1 tsp cardamom powder, and 5-6 black peppers. The masala is ready. Make this just before making the rice, the fresh masala will add a splendid taste to the rice. The same masala can be used for masale bhaat and khichdi.


Ingredients for the pulao
1.1 ½ cups basmati rice (or any other long grained rice)
2.1 tbsp ghee (butter) for making pulao and 1 tsp for frying cashews
3.2 tsp cumin seeds (jeera)
4.3-4 cloves (lavanga)
5.2 pieces of 1 inch long cinnamon sticks (dalchini)
6.5-6 black peppers (meere)
7.2-3 bay leaves
8.1 large onion – sliced thin
9.½ cup cauliflower florets
10.¼ cup carrots – diced
11.¼ cup French beans – cut into 1 inch long pieces
12.½ cup green peas
13.1 tbsp cashew pieces
14.Salt to taste

Making the pulao
1.Wash the basmati rice in 3-4 changes of water. Add double the quantity of water (3 cups in this case). Microwave the rice for 12 minutes. We need half cooked rice and you can alternately pressure cook with less water. Once the rice is cooked, hold it under cold water. This will separate the rice grains and make them fluffy. Drain all the water and keep the rice aside.
2.Heat 1 tsp ghee in a pan on low flame. Add 1 tbsp cashew pieces and fry till they turn light brown.
3.Heat a pan on medium flame. Add 1 tbsp ghee to it. Next, add cumin seeds, wait for them to splutter and then add bay leaves, black peppers, cloves, and cinnamon sticks. Fry for a minute.
4.Add the sliced onion and fry till the onion turns translucent. Now, add the carrots, cauliflower florets, peas, and french breans. Cover and cook on medium heat till all the vegetables are cooked. Stir the vegetables from time to time.
5.Add salt to taste and 2 tbsp of pulao masala (reduce the amount of masala for less spicier pulao). Mix well with the veggies. Add the fried cashews.
6.Add the rice cooked in step 1 and mix together. If you like loads of ghee in the pulao, add 1 tsp more at this stage. Cover and cook for 5-6 minutes.
7.Serve hot with tomato saar, papad, raita, and pickle.

This pulao-saar combo is a great dish to serve guests at dinner parties. Don't skip the essential veggies such as cauliflower, peas, and carrots. You can add more veggies to clean your fridge or to force some in your naughty kid's tummy:) Enjoy!

Jun 20, 2007

Going lite on the tummy

Phew! Coffee's theme for MBP this month was a much needed break from all the oily, sweet, or heavy food. While browsing through my fellow blogger's recipes for salads, raitas, soups or anything falling in the "lite" category, I stumbled upon this raita recipe. The Beetroot Tomato Cucumber raita recipe sounded like a must try. Vaishali's blog has a plethora of amazing recipes. She has tried out dishes using a variety of ingredients. So, why did I choose just this recipe?

A.I simply loved the vibrant colors of the beet and yoghurt mixed together.
B.I had all the ingredients in my pantry, except cucumbers. I skipped the cucumbers and coconut.
C. Beets are really low in calories. They offer N number of health benefits ranging from heart disease and cancer prevention, rich in nutrient proteins, blood purifier, and are a rich source of vitamin C.
D. There were 2 beets lying in the fridge from a long time. Hubby had purchased them and wanted to put them in sandwiches but the poor beets never caught his attention.
E. I had never cooked anything using beets since I came to the US.

Any variations?: Had to skip the cucumbers and followed the rest of the recipe as is.

Verdict: This raita turned out fabulous. I and P instantly fell in love with it. The peanuts add a nice, crunchy taste and the tempering adds a rich taste. We will be making this raita every time we get beets.

Thanks Vaishali for this fabulous recipe. And a big Thanks to Coffee for hosting MBP.

Jun 18, 2007

The ultimate comfort food – Metkut Bhaat

(RCI is a blog event started by Lakshmi and hosted this month by Nupur. Every month, a different host chooses a cuisine from India and bloggers come up with mouth-watering dishes special from that cuisine. The cuisine of the month is Maharashtrian. This cuisine is dear to my heart for the obvious reasons.)

Imagine you are sick with fever or a sore throat. What would you like to eat? If I was posed this question, I would say, “Metkut Bhaat”.

It was not easy for me to decide what to make for RCI: Maharashtrian cuisine; I wanted the dish to be something very special and unique to me. So, when I started rewinding my favorite dishes since childhood, one dish topped the list. Metkut Bhaat Tup Loncha ani Limbachi fod has been my favorite since I was a kid. This is a Maharashtrian specialty and an ultimate comfort dish for all seasons. I think the love for metkut has been passed on from generations to generations.

Metkut is a simple powder; it’s a mixture of spices and daal. It has a smooth texture and spicy taste. I don’t exactly remember mom making this, but we sure used to purchase Bedekar special metkut a zillion times. When I would be down with fever, metkut bhaat would be the only dish I would eat. Of course, mom would make me skip the pickle, to which I would agree with a frown.

For me, discovering the recipe and making metkut at home was like discovering an age-old secret. Don’t you think that sometimes we are unaware how easy it is to make something and we keep getting it from stores? That’s what happened in this case. I would have never imagined making metkut is so easy. The best part is all the ingredients would be readily available in your pantry. Here goes the method for making this delicious spicy powder.

Metkut

(Adapted from Annapurna)


1.Heat a pan on medium flame. Add 1 cup harbhare (kala chana or black chickpeas), 1/2 cup rice, 1/2 cup urad daal, 3 tsp wheat flour. Fry till the udad daal becomes light brown. This would take around 8 minutes. You will know it is fine to turn off the gas from the aroma.
2.Grind the above fried mixture with 1 tbsp cumin seeds, 1 tsp asafetida, 1 tsp turmeric powder, 2 tsp red chilli powder, 1 tsp coriander seeds, 1 tsp mustard seeds, 1/2 tsp fenugreek seeds, 1 tsp cardamom powder, 1 tsp cinnamon powder, 1 tsp ginger powder, and 1/8 tsp nutmeg powder. Sieve to get a fine powder.
3. Store in a jar or air tight container. This powder can be used for several weeks.

Serving suggestion: Take a small ball of cooked rice. Add 1 tsp metkut, 1 tsp ghee, and 1 tsp lemon juice to the rice. Mix well and enjoy with pickle. You can also add metkut to waran bhaat if you don’t like eating dry dishes.

Verdict: No more store bought metkut packets for me. I was elated on tasting this savory powder mixed with steaming rice. The taste was exactly how I remembered it. The US mixtures are pathetic. I had a tough time grinding all the ingredients. If you have a coffee maker, I think it would be easier to grind using it. This is a must-try for all Maharashtrian food lovers.

The recipe for metkut also happens to be Vaishali’s debut post. Some other Maharashtrian comfort foods that I found were:
Nupur’s Waran Bhaat
Manisha’s Wangi Bhaat
TC’s Shevgyachya shenganchi amti

Jun 15, 2007

Upma

(This is my contribution to WBB hosted by Trupti and started by Nandita. The theme this month is Spice it up. This is also my contribution for the letter "U" in Nupur's A-Z of Indian vegetables.)

Who doesn't like spicy breakfast? We all do. Be it poha, upma, or omlettes it's good to start the day with some hot and spicy taste. Spicy breakfasts are a good variation from the everyday bowl of cereals and orange juice. With just a little bit of preparation the previous night, you can cook these breakfasts in a jiffy.

There are many variations to how you can make upma. There's the South Indian style of adding urad daal to it. You can also experiment with a lot of vegetables. I remember my best friend's mom used to make the best upma ever. Somehow my friend was never a upma fan, which gave me all the more reason to ask aunty to make upma. God, I still remember the taste of that upma. She used to put cauliflower in it and it tasted awesome.

Here's another simple way of making upma.
Matar Upma

Serves: 4
Prep time: 35 minutes

To make upma:
1.Finely chop 1 medium onion and 4 green chillies. Boil 1/2 cup peas.
2.Heat a pan on medium flame. Add 1 1/2 cup rava/semolina. Fry till the rava turns golden brown. Keep this aside in a plate. Add a pinch of sugar and 1/2 tsp red chilli powder to the rava.
3. Heat 1 tbsp oil in a pan. Add 1 tsp mustard seeds and when they splutter add a pinch of asafetida, chopped green chillies, and 10-15 curry leaves. Fry for a minute.
4. Add chopped onion and saute till the onion turns light brown. Next, add the boiled peas, salt to taste, 2 tbsp cashew pieces, and 2 tsp curd. Mix well. Check seasoning.
5. Add 3 cups of water to the above mixture. Basically, you need to add double the amount of water in the rava. Boil this on high heat for 5 minutes.
6. Add the rava; mix and make sure that no lumps are formed. Cook for 5 minutes and serve hot.
Serving suggestions: A little bit of extra effort can go a long way in making a dish presentable. Of course, you can't do this for the early morning breakfast. But if you are serving upma to your guests, try this. Sprinkle some cilantro in a small bowl, add some shredded coconut on top, then add upma. Firmly press the upma. Turn the bowl upside down in your serving dish. Serve with lemon.

Jun 9, 2007

Taco Soup


(This is my entry for the letter “T” in the A-Z of Indian vegetables. Though this soup is not so Indian, it’s healthy and nutritious.)
I got this lovely soup recipe from my friend P. She had made this for a potluck party and all of us simply loved the soup. It contains lots of veggies and beans wish a dash of Mexican dressing. The soup is very filling and so tasty that you won’t stop at one bowl. Here’s how to make this soup:
Taco Soup


(Serves 3)
1.Take 1 cup beans such as Lima, Kidney, Northern, Garbanzos. Basically, any type of beans that you like. Soak them overnight. Next day, pressure cook them for 3 whistles. Do not drain the water.
2.Finely chop 1 onion, 1 tomato, 1 small capsicum, and 2 green chillies.
3.Blend 1 tomato in the mixture and make puree.
4.Heat butter in a pan. Add onions and sauté till the onions turn translucent. Add green chillies and fry for a minute.
5.Add ½ tsp ginger paste and ½ tsp garlic paste. Fry for a minute.
6.Now add the chopped tomatoes and chopped capsicum. Fry till the tomatoes are soft.
7.Add the tomato puree and cook for 2-3 minutes.
8.Add salt and pepper to taste, 1 tsp taco mix (I used Old El Paso Mild mix), and 2 tsp ranch dressing.
9.Now add the cooked beans with the water and simmer for 15-20 minutes on low heat.
10.Taco soup is ready. Serve hot garnished with sour cream and grated cheese.

Round-up: Here is the round-up of T dishes.

Jun 7, 2007

Happy Birthday, Meeta!


(This is my contribution to Meeta’s MM. This month Meeta has invited us for her virtual birthday party.)
Remember the ad in which a cute kid gets angry with everyone at home, runs away from home, and is found and brought back by his servant? The kid’s mom makes his favorite sweet, and on seeing it he exclaims “Jalebi” in a very cute voice. He’s content eating them, forgets all about leaving home, and when his moms asks him if he wants to go away he answers “Jana to hai, magar bees pacchis saal baad”. Well, that was my favorite ad for quite some time and jalebis have been my all time favorite since quite some time. I don’t have a sweet tooth, but jalebis and gulab jamuns are two exceptions.

This one’s for you Meeta, as you celebrate another birthday. Since the time I have seen your blog, I have admired it for the plethora of recipes and the superb photographs. This sweet is also for a sweet little princess. My best friend delivered a baby girl last week and though I was not there to share the special moments, I celebrated in my own way by eating jalebis.

Jalebis

(Adapted from this recipe)
Yields around 20-25 jalebis
Prepation time: 2 hours for fermentation plus an hour for frying and making syrup.
Ingredients
For the batter:
1.2 cups all purpose flour (maida)
2.11/2 tbsp rice flour
3.1/4th tsp. baking powder
4.2 tbsp curd (plain yogurt)
5.11/4th cups warm water
6.1/2 tsp saffron threads, slowly dry-roasted and powdered
7.Ghee or vegetable oil for frying

For the sugar syrup
1.3 cups sugar
2.2 2/3rd cups water
3.1/2 tsp green cardamom seeds powder

Method
1.Mix the all purpose flour, rice flour, baking powder, curd and 3/4th cup of water in a bowl (preferably a ceramic bowl). Mix well with a whisk.
2.Add remaining ½ cup water and 1/8th tsp of saffron powder, and whisk until smooth.
3.Set aside for about 2 hours to ferment.
4.Whisk thoroughly before use. Do steps 5 and 6 simultaneously.
5.Prepare one-string sugar syrup by dissolving sugar in the water. Just before the syrup is ready add saffron and cardamom powder.
6.Heat oil in a kadhai. Pour the batter in a steady stream (or coconut shell with a hole) into the kadhai to form coils. I added the batter in an empty ketchup bottle. Make the coils very fast. If you hold the batter for too long, then the coil will separate out. You won’t get it right the first time, but with practice and patience you will get it right.Deep fry them until they are golden and crisp all over but not brown.Remove from the kadhai and drain on kitchen paper and immerse in the syrup.
7.Leave for at least 15 minutes so that they soak the syrup.

(Baby snakes in sugar syrup:)
8.Take them out of syrup and serve hot.

Did you know?: Jalebis taste wonderful with buttermilk. When I first saw someone dipping a jalebi in buttermilk, I gawked in horror. Then that person convinced me to try it and I loved the taste. The next time you make/eat jalebis, dip one in buttermilk and let me know how you find it.

View the round-up here.

Jun 3, 2007

Schezwan Dosa

(This is my entry for the letter "S" in Nupur's A-Z of vegetables. This lovely Indo-Chinese dish fills your tummy and pleases your tongue.)

Note to my readers: Request you to read my article Home Alone in which I have mentioned tips for girls on the H4 visa to utilize their free time in an effective way.

Mumbai: the city that never sleeps. The city I love and miss for so many reasons – it’s the city where I was born and brought up. When I think of Mumbai, I miss my home, my parents, my school, every lane I that is close to home, the crowd, the trains, traveling in crowded buses and in rickshaws, the sights and smells of the city, the familiar places and shops, the haggling of prices with vegetable sellers, the festivals and sweets, the galli ka cricket, and the Mumbai rains. But if someone would ask me to name the thing that I miss most about Mumbai, it would be definitely the Mumbai street food. Now, I am aware that too much of street food is bad for health. But it’s not my fault that I was introduced and fell in love with the Mumbai junk food.

I was in Ruia for class 11th and 12th. And for those who are familiar with the college and its surroundings, they would know that it’s a heaven for junk food lovers. There are several restaurants in and around Ruia. The first ones that come to my mind are Mani’s, DP’s and a Chinese joint whose name I fail to recollect. Then there was the vada pav wala right outside King George School. Walk further for around 5 minutes and you will reach D. Damodar’s snacks and sweet shop. I was so in love with the samosas, kachoris, and pattices sold in this shop that I was hoping I would marry someone from their family. Thus began my eternal love affair with junk food.

I used to frequent the junk food joints near Shivaji Park, eat chat near Citylight, hog on wada pav whenever I felt like. Of course, my parents saw to it that I did not overdo it. There were times when I used to eat shev puri on my way back from office and then declare that I would eat less for dinner. My mom used to ask me if I had eaten any junk food, and I used to say “No”. Then she used to probe me like a police officer and I used to sheepishly answer in the affirmative

My chat love often took me to Ghatkopar where two of my best friends resided. We used to take a stroll down “Khau galli” and sample yummy snacks at cheap prices. The chief among them were dabeli and chat. Schezwan Dosa is one dish that I had seen on the streets of Ghatkopar, but never got the chance to sample. My husband and best friend have tasted this dish and I have tried to recreate this lovely dosa with their help.

Schezwan Dosa

Makes around: 6 schezwan dosas (the dosa batter will yield another couple of sada dosas)
Cooking level: Medium
Preparation time: I took around 2 hours for making dosas, chutney, and sambhar.

For the stuffing (schezwan vegetable mixture):
Ingredients
1.1 ½ cup shredded cabbage
2.½ cup capsicum – chopped to pieces
3.½ cup carrots – chopped finely to pieces
4.1 big onion – sliced thin
5.½ cup noodles – cooked aldent (boil water and cook noodles for exactly 2 minutes)
6.Salt and pepper to taste
7.1 tbsp oil
8.1 tbsp schezwan sauce (I used Ching's schezwan sauce)
9.½ tbsp soya sauce
10.1 tsp chilli vinegar

Method for the stuffing:
1.Heat a pan and add 1 tbsp oil in it.
2.Add carrots, capsicums, cabbage and onion and fry on high heat till the vegetables are cooked.
3.Next, add the noodles and fry for 2-3 minutes.
4.Add salt and pepper to taste, schezwan sauce, soya sauce, chilli vinegar and mix all the ingredients well.
5.Cook for 3-4 minutes and turn off the heat.

For the schezwan dosa:
1.Wash together 2 cups rice, ¾ cup urad daal, and 1 tsp fenugreek seeds. Soak this mixture for 3-4 hours.
2.Grind the above mixture and ferment it overnight. For me, overnight fermentation doesn’t work, so I ferment the mixture for almost 24 hours before making idlis/dosas.
3.Add salt to taste in the batter.
4.Heat a pan and put 1 tsp oil on it. Pour a spoon of batter and spread evenly. Add a little bit of oil on all sides of the dosa. Flip the dosa on the other side and cook for about 30 seconds.
5.Now, spread 1 tsp of schezwan sauce on this side of the dosa and spread evenly. Add a spoonful of the schezwan vegetable mixture on one edge of the dosa. Let cook for another 30 seconds.


6.Roll the dosa and transfer on a plate.
7.Continue making more dosas repeating steps 4,5, and 6.
8. Serve hot with sambhar and chutney or enjoy without any accompaniment.


Verdict: Superb, that's how these dosas turned out. You can use less noodles and more vegetables in the stuffing. These dosas are quite filling and a crowd pleasure. Check out another lovely Indo-Chinese dish from Swad.

View the round-up of S vegetables here.